Drawing an electrical circuit diagram with symbols
Making a circuit and drawing it using circuit symbols
Electricity is magical to kids. The idea that an invisible force can light up a bulb, power a toy, or charge a device is fascinating. Through drawing and making simple electrical circuits, children not only gain a practical understanding of how this magic works but also experience the thrill of creating something functional with their own hands.
They will enjoy the hands-on nature of the activity, connecting different components like batteries, switches, resistors, and LEDs. This tangible form of learning helps them directly see, touch, and understand the concepts they're studying.
This is one of a set of resources developed to support the teaching of the primary national curriculum, particularly for key stage two (KS2). It has been designed to support the delivery of key topics within science and design and technology.
This could be used as a one-off activity or as part of a wider unit of work focusing on electricity and electrical circuits. It can also be used in conjunction with the IET Faraday Primary Poster – Circuits and Symbols.
Activity: Making a simple electrical circuit and drawing it using circuit symbols
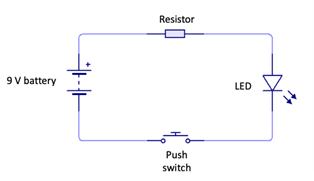
In this activity learners will construct a basic series circuit using a battery, switch, resistor and an LED. They will learn about why symbols are used instead of pictures to represent components and produce a circuit diagram for the circuit that they have constructed.
This activity will take approximately 35 – 60 minutes.
Tools/supplies needed:
Parts and Components:
Red and black crocodile clips
9 V batteries and clips
Resistors (330 ohms recommended)
Light emitting diodes (LEDs)
Push switches
Tools and Equipment:
Pencils, pens, and rulers
CAD circuit simulation software (for extension activity)
Follow our step-by-step guide on making a basic light emitting diode (LED) circuit
1. Connect one end of a red crocodile clip to the red wire of the battery clip. Connect the other end to one leg of the resistor.
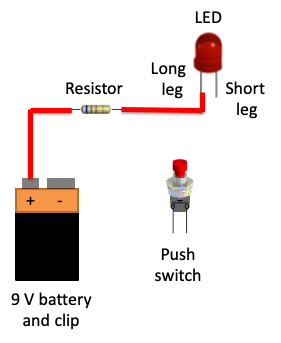
2. Connect one end of another red crocodile clip to the free leg of the resistor.
3. Connect the other end to the long leg of the LED. Connect one end of a black crocodile clip to the short leg of the LED. Connect the other end to one leg of the switch.
4. Connect the one end of another black crocodile clip to the free leg of the switch. Connect the other end to the black wire of the battery clip.
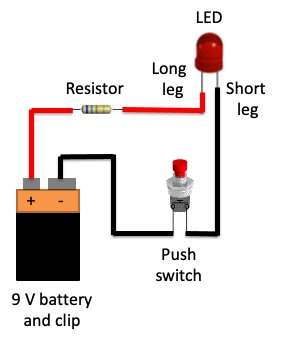
5. Push the switch to watch the LED light!
The LED should light when the switch is pressed. If it doesn't, check all your connections are correct and the LED is the right way round.
Follow our step-by-step guide on drawing a circuit diagram using symbols.
1. Draw the symbols for the battery, resistor, LED and switch.
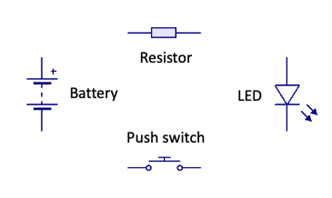
2. Join the component symbols together using straight lines. You MUST ONLY use horizontal and vertical lines.
3. Label all of the components used.
The engineering context
Understanding how electrical circuits are drawn and communicated is a fundamental skill for any engineer. This includes the use of circuit symbols to produce circuit diagrams and schematics. This knowledge will be invaluable when your students are investigating, designing, or making electrical and electronic circuits in the future.
Suggested learning outcomes
Upon completion of this activity, your students should have a clear understanding of how and why circuit symbols are used to create circuit diagrams. They should be able to assemble a simple series circuit that lights an LED, and draw a circuit diagram for a simple LED circuit. This activity provides a practical, hands-on way to teach these important concepts.
Download our activity sheet and other teaching resources
The activity sheet includes teachers’ notes, useful web links, and links (where appropriate) to the national curriculum in each of the four devolved nations; England, Northern Ireland, Scotland and Wales.
All activity sheets and supporting resources are free to download, and all the documents are fully editable, so you can tailor them to your students’ and your schools’ needs.
You can download our step-by-step instructions below as both a classroom lesson plan and a PowerPoint presentation.
Please do share your highlights with us @IETeducation.